
The Honda CRV Brake Light Stays On – Easy Solutions
Your brake light mainly safeguards you from any back attacks. But what happens when those lights are always on? Your car’s brake system might get damaged or a collision might happen.
So what to do when the Honda CRV brake light stays on? Well, the reason why this is happening is that the brake switch might be damaged or the rubber grommet might go missing. You can easily solve the issue by replacing the old switch or installing a new grommet. Apart from that you may need to refill your brake oil tank or replace the brake pad.
The issues may seem difficult to solve, but they are very easy. That is why, here we will tell you how to fix the brake light issue.
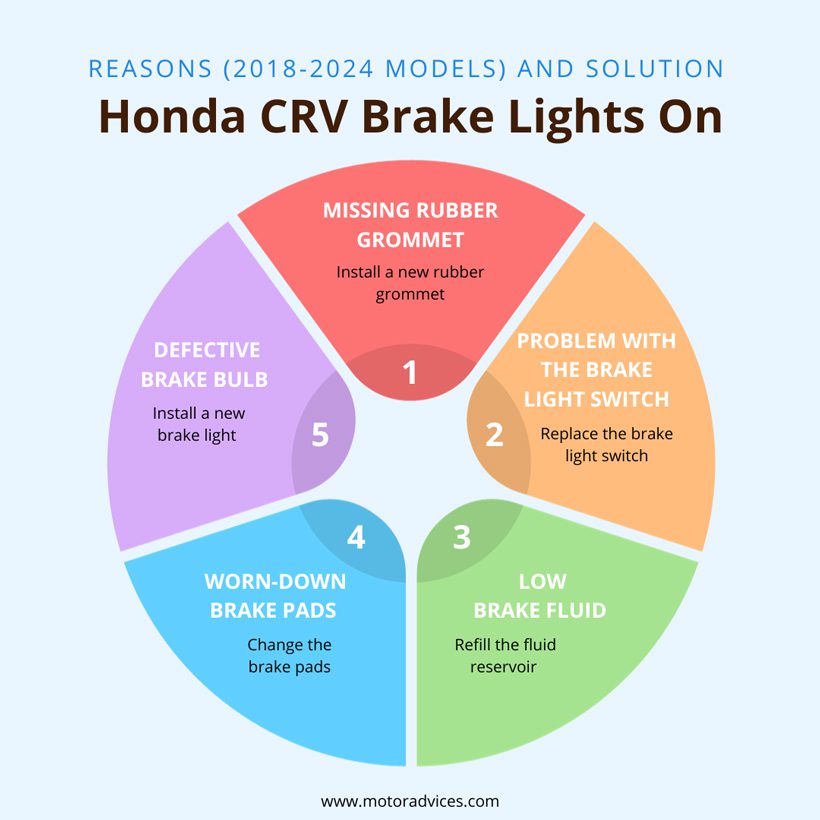
Table: Possible Reasons and Solution of Honda CR-V Brake Light Staying On Issue

There are a few reasons why your brake light might not switch off. You can easily tackle it on your own. So, here we have given you a short preview of what may be causing this issue and how you can fix it!
| Reasons (2018-2024 Models) | Solution |
|---|---|
| Missing rubber grommet | Install a new rubber grommet |
| Problem with the brake light switch | Replace the brake light switch |
| Low brake fluid | Refill the fluid reservoir |
| Worn-down brake pads | Change the brake pads |
| Defective brake bulb | Install a new brake light |
Honda CRV Brake Lights On – 5 Things to Do
A brake light helps the driver behind you to judge how you are going to maneuver your car. A defective brake light will not only confuse the drivers behind you but may also cause serious accidents.
Not to mention, you might even be pulled over by a cop for this issue. So, when you see your brake lights are continuously switched on, you have to treat it immediately.
Here we are going to elaborately tell you how you can fix this problem on your own:
Missing Rubber Grommet
Most often the Honda CRV brake lights on issue is caused by a missing brake grommet or brake switch stopper. You will find it right under the brake switch. Over time this part degenerates and breaks away from the switch.
When that happens, you have to get a new one and install it in its designated place. Here is how you do it:

Step 1: Locate the brake switch
First, you have to look for the brake switch. It is located at the end of the brake pedal. Now to find this you have to remove the true cover. The cover is right underneath the dashboard. Now, that the end of the brake pedal is totally visible, you can see the brake switch.
Step 2: Install the Rubber Grommet
Under the brake switch, you will see that there is a blank space. In there insert the grommet. This should make your brake light flicker off.
To understand this procedure better here is a video link:
Problem with The Brake Light Switch
If you see that your rubber grommet is just in place and working properly then the issue might be with the brake light switch. When you press down your brake pedal, this switch turns your brake light on. When this part becomes old or worn out, it may not work properly anymore.
So, you have to replace the damaged switch as soon as you can. To do this you have to first locate the switch, we have already told you the procedure. Once, that’s done you proceed:
Step 1: Extract the Brake Switch
Here, you have to detach the brake switch. You just have to rotate it 45 degrees counterclockwise. Once it’s loosened, take it out of its place.
Step 2: Disconnecting the connector
Once it’s out, you will see that it is connected to a connector. You have to detach that connector. Here, you can also inspect if there is any wear or tear on the connector.
Step 3: Place the New Brake Switch
Now, take the new brake switch and connect it with the connector. After that put it in the previous. When that’s done check your brake lights.
Low Brake Fluid
Low brake fluid is another probable reason for your brake light’s defect. Apart from that it may also cause brake failure. That’s why you should frequently check your reservoir. Here is how you can do it:

Step 1: Find the Reservoir
Here, you have to open the hood of the Honda CRV and secure it. Now locate the fluid tank. It Should be positioned on top of the main cylinder. It usually sits in one of the engine compartment’s rear corners
Step 2: Check Oil Level
The oil reservoir has two indicators. One indicates the maximum level, and one is the minimum level. You have to make sure that you have enough oil so that the indicator is above the base level.
Step 3: Refilling
Now, keep pouring oil into the tank until it reaches the minimum level indicator. You should also inspect leaks and holes. If there is any leak on any component of the reservoir, you might just have to change that part.
Worn-Down Brake Pads
Sometimes your brake pedal might not come up at all. When this happens, your brake light won’t switch off nor will your car work properly. Sometimes the issue may lie with the spring of the brake pedal.
All these happen due to a defective brake pad. When you press the brake, serious friction is caused between your brake pad and the brake disk. This causes thermal damage to your brake pad. When this happens you have to change the brake pad.

Here, is the full procedure:
Step 1: Removing Wheel
First, you put the car on the car jack and then you have to remove the wheels of your car. So, take out your wheel clock and take out the lug nuts. Once the wheel is loose, take it out. Then, lift your car.
Step 2: Removing the Brake Caliper
The brake caliper is situated right above the brake pad that’s mounted on the rotor disk or brake disk. Unscrew the mounting bolts and take out the caliper.
Step 3: Replacing the Brake Pad
Now, unmount the old brake pad and put the new brake pad in its place. After that put the caliper back on and screw it. Put the wheels back on and see if the problem persists.
Defective Brake Bulb
Brake bulbs usually have a lifespan of a few years. Time and hectic use may cut that short. You’ll just have to replace the bulb when it happens. Now, how would you do that? Here is how:

Step 1: Removing the Tail Light Cover
To remove the old light you will first have to open your back hood. On both sides, you will see covers that are protecting your lights. Now, remove the defective light’s cover.
Step 2: Changing the Light
After removing the cover, you will see the bulb, bulb holder, and wirings. Take out the old wiring by rotating it counterclockwise. Now, put the new bulb in the holder and put the cover back on.
If you’re experiencing issues with your Honda CR-V’s brake light staying on, it’s worth checking out our article on Honda Accord brake light stays on for insights and solutions. Additionally, if you’ve noticed your vehicle’s battery light comes on and then goes off when accelerating, our guide on battery light comes on then goes off when accelerating may help you diagnose and resolve the issue.FAQ
We understand that a lot of things are going around your mind right now. So we have tried to address a few of them here:
It hardly ever happens. So we would say no.Wiring defect can cause a lot of damage but brake light issue is not one of them.
Yes, it will. As the lights are taking power from the battery, it will drain the battery even after your car is not in gear. This might even hamper the battery’s work efficiency.
It is important that you understand the urgency of this situation. A continuous switched-on light can damage your battery and brake system. So, you should not drive your car until it is fixed.
Conclusion
The brake lights of your Honda CRV stand as a symbol of your car’s fitness. When something happens to the lights, it means your car is not fit to be on the road. The Honda CRV brake light stays on mainly when the brake switch is damaged or the rubber grommet goes missing. It might also be due to the low fuel issue or worn-down brake pads and bulbs.
Whatever the cause is, you can now easily manage on your own. However, we will always encourage you to visit a mechanic shop for regular maintenance every once in a while.